Internationalization and Localization in Angular: Building Apps for a Global Market
Imagine this: You’ve just launched a sleek Angular app, Flowmono, an app that helps automate the process of signing and approving documents. People love it! They’re saying it’s simple, fast, and just works. You’re feeling great, everything’s going well…
Then your CEO drops a surprise:
“We’re expanding to Cameroon, Spain, the U.S., and Brazil next year. Let’s make the app speak their languages—literally.”
Suddenly, it’s not just about code anymore. It’s about making sure Flowmono can greet users with “Bonjour,” “Hola,” “Hello,” or “Olá”—depending on where they are.
Suddenly, your clean codebase feels like a liability. Buttons, labels, and error messages are hardcoded in English. Dates appear as “DD/MM/YYYY,” confusing users in the United States. Prices show up in NGN, even for someone in Barcelona. Your app, once a local hero, now feels alienating to 90% of its potential users.
This is the reality of going global: If your app doesn’t speak your users’ language (both figuratively and literally), you’ll lose them.
The First Step to Global Domination: i18n & l10n
To bridge this gap, developers use two interconnected processes:
- Internationalization (i18n): Preparing your app to support multiple languages and regions.
- Think of this as building a “translation-ready” foundation. You extract text strings, format dates/numbers dynamically, and ensure the UI adapts to languages like Arabic (which reads right-to-left).
- The term “i18n” comes from the 18 letters between the “i” and the “n” in “internationalization.”
- Localization (l10n): Adapting your app for a specific language or region.
- This is where you translate text, adjust currency symbols, and tweak colors or images to respect cultural norms.
- Similarly, “l10n” abbreviates the 10 letters between the “l” and “n” in “localization.”
Internationalization & Localization in Angular
Angular’s built-in internationalization (i18n) tools make it straightforward to prepare your app for global audiences. Here’s how to get started:
Set Up Angular Project for i18n
First, we install the @angular/localize package within the application:
ng add @angular/localize
This package makes sure the app can handle things like formatting dates, numbers, and currencies based on each country’s style, and also supports translating text into different languages.
Mark Translatable Text in Templates
Next up, we’ll specify the text we want translated. We’ll pass i18n attribute to to the tags as follows:
This lets Angular’s extraction tool gather all the text that needs to be translated.
Extract Strings into a Translation File
After we have marked all the text we want to translate, we’ll use the extract-i18n Angular command to extract all the marked strings into a source language file. To do this, run the following command:
ng extract-i18n --output-path src/locale
This generates a messages.xlf file (XML Localization Interchange File Format) in the src/locale directory. This file contains all marked strings, ready for translation. This is an example of the content of the file:
We can see the text that we marked for translation within the <source> tag:
Create Translated Versions (Localization)
We will create a translation file for the target locale(s) or language(s) we need. To do this, we will make a copy of the generated messages.xlf file and rename it to reflect the target locale.
messages.xlf --> messages.{locale}.xlf
For example, messages.fr.xlf is used for French. We then update the content of this messages.fr.xlf file to include the target translation for each source text. For each <source> text, we will place the corresponding translation within a pair of <target> tags, directly below the <source> tag:
Translators, Google Translate, or conversational AI tools like ChatGPT can be used to generate these translations efficiently.
Configure Angular for Multiple Locales
Next, we’ll update angular.json file to define supported locales and their corresponding translation files. Here’s an example configuration for an app named Flowmono-Website:
What do these updates do?
i18nConfiguration:sourceLocale: Specifies the default locale (e.g.,en-USfor U.S. English).locales: Maps each locale (e.g.,frfor French) to its translation file (e.g.,messages.fr.xlf).
buildConfiguration:- Adds a
frbuild configuration that tells Angular to localize the app for French ("localize": ["fr"]).
- Adds a
architectConfiguration:- The
servesection allows us to serve a specific locale during development. For example, thefrconfiguration underservelets us run the app in French by targeting the French build configuration.
- The
Serving Localized Builds
With these updates, we can now serve our app in different languages during development. For instance, to serve the French version, we’ll run:
ng serve --configuration=fr
This command builds and serves the app using the French translations in messages.fr.xlf, and locale-specific settings.
To serve the app in the default locale (English), simply run:
ng serve
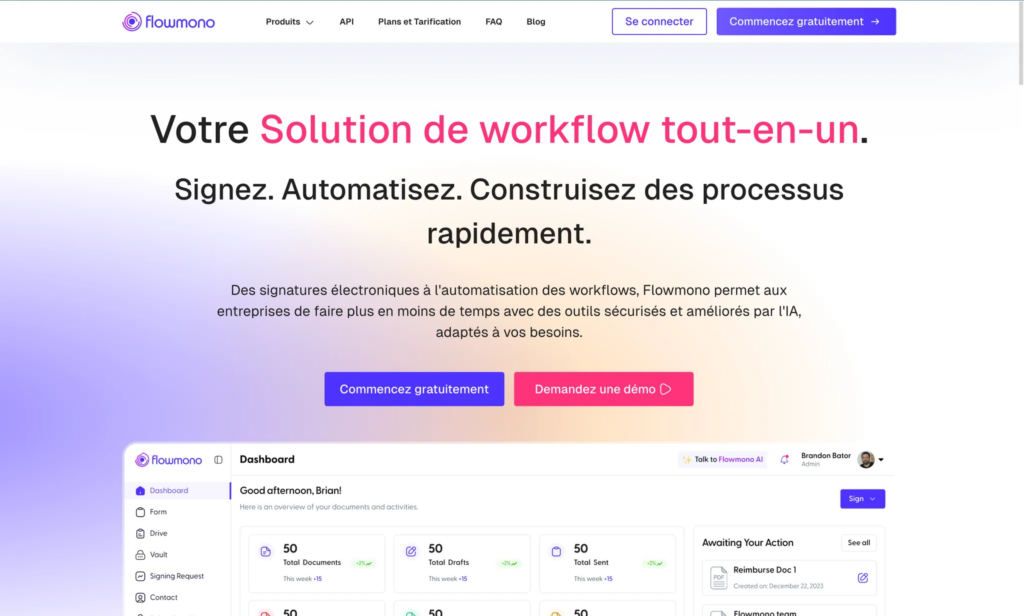
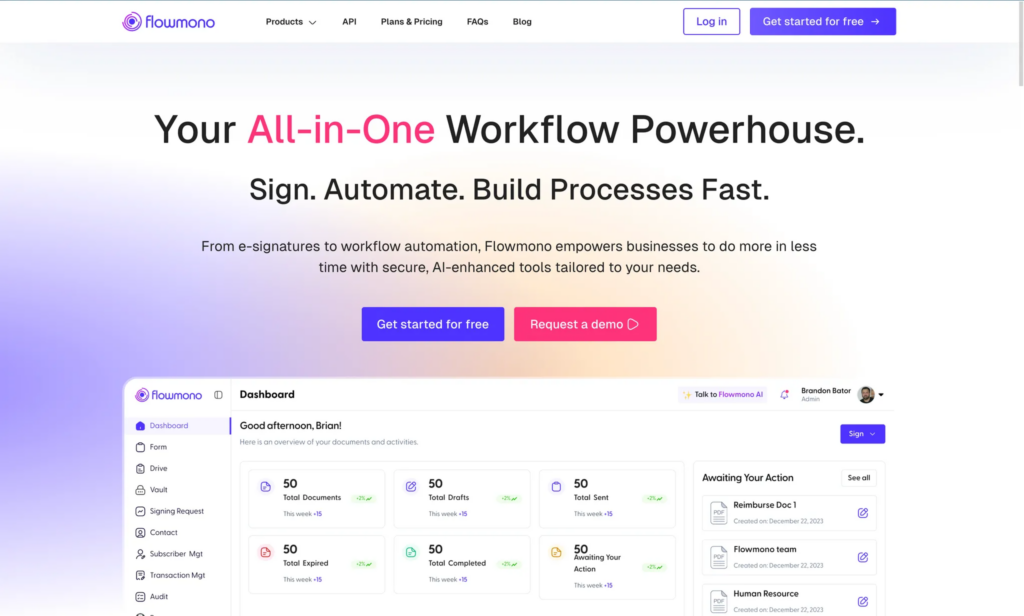
Below are screenshots of the app running in English (default) andFrench (localized):
Building for Production
To build the app for all configured locales, run:
ng build --localize
This generates separate bundles for each locale (e.g., dist/Flowmono-Website/fr/ for French).
Conclusion
We’ve explored the essential steps for internationalizing and localizing an Angular app, ensuring it’s ready for a global audience. By using Angular’s built-in i18n tools, we can easily mark text for translation, extract strings, and configure different locales to tailor our app for various regions. The process of internationalization (i18n) sets the stage for global reach, while localization (l10n) fine-tunes the app for specific markets. With Angular’s solid support for these features, we can scale our app’s reach without sacrificing user experience.
What’s Next?
Now that we’ve covered the basics, here are some advanced areas to consider as the app evolves:
- Dynamic Content Localization: Beyond the static text, we may need to localize dynamic content, such as user-generated input or data pulled from external APIs.
- Right-to-Left (RTL) Languages: Languages like Arabic and Hebrew that read right-to-left need special attention. Angular has built-in support for RTL, but further tweaks may be required to ensure everything looks and works just right.
- Advanced Date/Time and Currency Formatting: While we’ve touched on basic formatting, we could take it further by adding region-specific features like custom date pickers or localized currency selectors for a more immersive experience.
- Automatic Translation Management: For larger applications, integrating a translation management system can streamline the process of adding and maintaining translations. Services like Transifex or Phrase offer seamless integration with Angular.
- Locale-Specific Features: There may be certain features that need to be tailored based on the country. This could include local payment gateways, legal compliance, or region-specific functionality.
By exploring these advanced topics, we’ll ensure our app not only speaks the user’s language but also meets their unique needs, fully preparing it for a global market.